Can intercooler leaks damage a turbocharger?
A leaking cooler releases air the compressor has already worked to compress. If boost control tries to recover the missing manifold pressure, the turbocharger may run faster and handle more airflow. A large enough leak can push it toward overspeed, especially under sustained load.
Diesel turbocharger boost leak symptoms can include increased black smoke and exhaust gas temperature (EGT) when less air reaches the cylinders and fueling exceeds the available oxygen. Engines that limit fuel may instead lose power or derate. These symptoms justify testing; they do not prove the cooler is cracked.
| Observation | Possible connection to leakage | Useful next check |
|---|---|---|
| Low boost or an underboost code | Compressed air escapes before reaching the manifold | Inspect the entire charge air path |
| Black smoke or high EGT under load | Too little air reaches the cylinders for the fuel delivered | Check for leakage before blaming the turbo |
| Oily dirt around a connection | Intake oil mist escapes with boost air | Clean, then bubble-test the joint |
| Coolant loss without an external drip | Possible internal leakage in a water-cooled cooler | Test the air and coolant circuits separately |
A complete boost leak test includes pipes, boots, clamps, and other connections within the specified test boundary. To judge the cooler itself, isolate it. A pressure drop across the entire intake system cannot identify which component leaks, and an attached engine can introduce leakage through its valves.
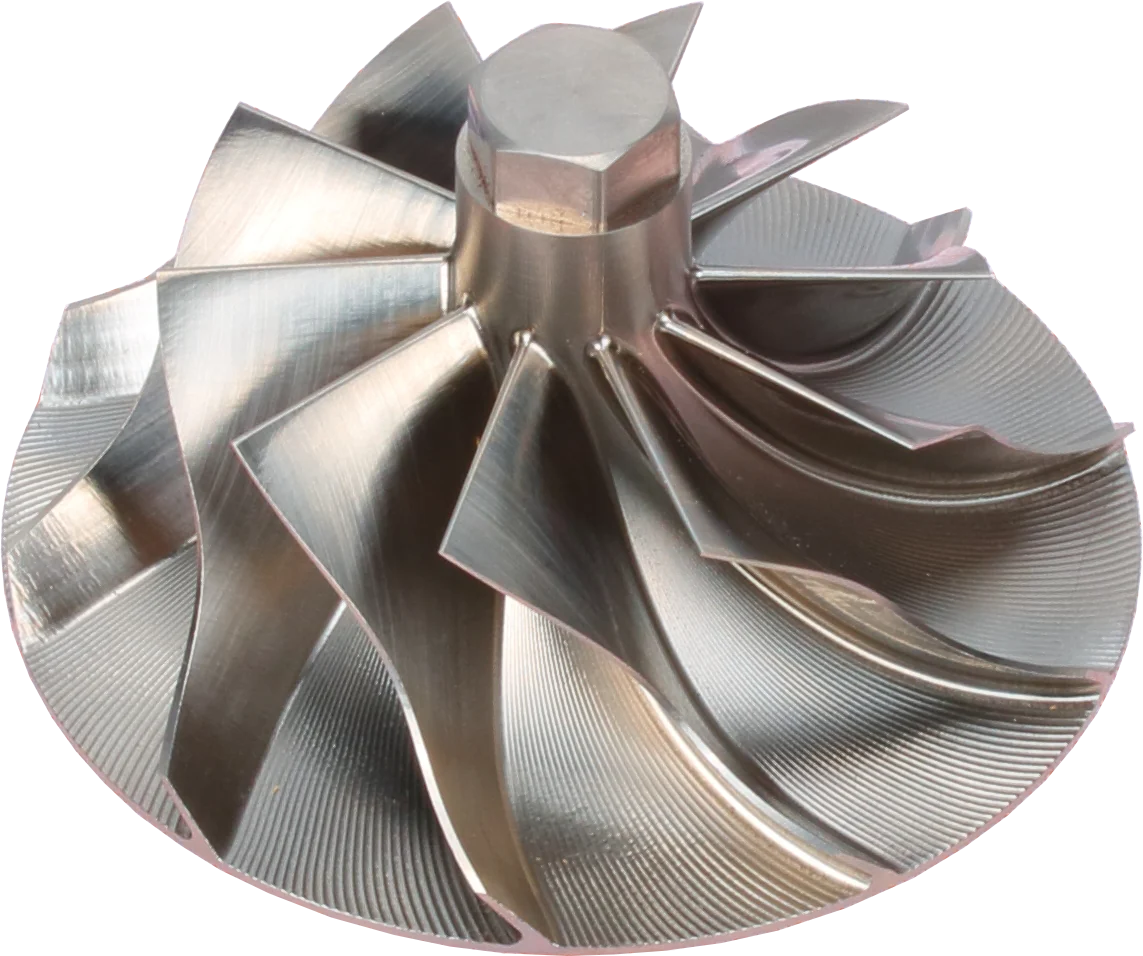
Blades: inspect for chips, bends and contact marks.
Hub: part of the balanced rotating assembly.
Outer blade tips: check for housing rub.
Product photograph from 2026. Numbers identify the features explained below.
Set up the intercooler leak test safely
To determine how to check turbocharger boost leaks, obtain the cooler or vehicle manufacturer's test pressure, stabilization time, test duration, and allowable pressure loss. Normal boost pressure is not permission to use that pressure for a shop test. If no specification is available, get one before proceeding. As an example of scale only, many heavy-truck charge air cooler procedures test at about 30 psi (2 bar) and allow only a few psi of loss over roughly 15 seconds; always use the figure published for your specific cooler.
- Work with the engine stopped, protected against accidental starting, and cool.
- Use pressure-rated caps, adapters, and hoses with positive retention designed for the application. Avoid improvised plumbing plugs.
- Fit a regulator and shutoff valve, with a readable gauge and properly set relief valve on the isolated cooler side.
- Wear eye protection and stay out of the caps' possible ejection paths. Never hold a plug in place by hand.
- Secure the cooler and never exceed the specified test pressure or any fixture component's rating.
Compressed air stores energy. A released cap can become a projectile even when the pressure sounds modest.
Run a pressure-decay test
Test the cooler alone when the aim is to accept or reject a used or rebuilt unit.
- Isolate it. Disconnect the cooler from the turbocharger and intake manifold, or remove it for bench testing. Close all specified ports with the correct adapters.
- Check the fixture. Inspect sealing surfaces and seals. Check caps, valves, gauge connections, and hoses for leakage; a faulty adapter can make a good cooler appear defective.
- Fill slowly. Use clean, dry regulated air. Bring pressure up gradually to the specified value while watching the gauge at the cooler.
- Allow stabilization. Filling warms the air, and hoses can stretch. Follow the specified settling period, then establish the required starting pressure.
- Isolate and time. Shut the supply valve so the regulator cannot replace escaping air. Record starting pressure, ending pressure, and elapsed time without topping up.
- Evaluate and vent. Compare the result with the manufacturer's allowed loss for that method. Release pressure through the bleed valve and verify zero before touching caps.
| Reading | Check before deciding |
|---|---|
| Fast pressure loss | Open ports, a major split, or a cap or fixture leak |
| Drop immediately after filling | Cooling air or fixture expansion; repeat after proper stabilization |
| Repeatable loss after stabilization | Locate leakage and compare with the correct service limit |
| Pressure holds but symptoms remain | Heat-sensitive cracks, leakage elsewhere, restriction, or another engine fault |
A longer hose or larger trapped volume changes the relationship between pressure loss and leakage. Do not borrow an acceptance limit from a different fixture or a whole intake system.
Record the intercooler leak test pressure, stabilization period, timed pressure drop, fixture arrangement, and any repaired locations.
Find the leak with bubbles or immersion
With the cooler safely held at the approved pressure, brush on a material-compatible soap solution or dedicated leak-detection solution. Cover tank seams, tube connections, fittings, and suspect rubbed areas, as well as the adapters. Growing bubbles identify escaping air; foam left by brushing is not enough. Remove residue as the product instructions require.
For a removable cooler approved for immersion, a supported water-bath test can reveal leaks hidden between fins. Look for a persistent stream from one location. Trapped air on fins may bubble briefly without a leak. Keep sensors and unsuitable attached components out of the bath. Raise the cooler clear using its fixture before bleeding pressure to prevent water entering through the defect, then drain and dry it.
These methods locate leakage. They do not establish an allowable leakage rate unless they form part of a specified test.
What factory tests reveal about welds and brazed joints
Production equipment seals the cooler's passages in a fixture, fills them to a controlled pressure, then measures pressure decay after isolation. Other equipment measures the airflow needed to maintain pressure. A sealed outer chamber can instead register a pressure rise as gas escapes into it. Controlled temperature, test volume, and fixture sealing make the results repeatable.
Tracer-gas equipment uses a detectable gas, such as helium, and a sensitive detector to identify small escape paths.
A weak weld or incomplete brazed bond may still be airtight. Because a weakly bonded joint can still pass a leak test, manufacturers add structural and process checks that a repair shop cannot easily reproduce.
Leak testing and structural proof testing answer different questions. Never copy factory proof pressures for a shop leak check, and do not treat an airtight result as proof of unlimited fatigue life.
Check water-cooled coolers for internal leaks
For a removed water-to-air cooler, drain both circuits and follow the manufacturer's internal-leak procedure. Each circuit has its own pressure limit. Do not assume the coolant passages can withstand the charge air test pressure.
One approved bench approach pressurizes the air side while the drained coolant circuit vents through an observation hose into water. A sustained bubble stream after trapped air clears suggests an internal connection. Keep that observation circuit vented; closing it could expose the coolant passages to excessive pressure. Use this arrangement only where the cooler's procedure permits it.
For the reverse check, use the approved fluid and coolant-side test pressure while inspecting the initially dry air passages for seepage.
Leak direction can change: boost may push air into coolant during operation, while coolant can enter the intake after shutdown. If liquid has reached the intake, keep the engine off until the fault and contamination are addressed. Ingested coolant can cause hydrolock.
Judge oil contamination before reinstalling
A light internal film may be expected when crankcase ventilation feeds oily vapor into the intake. There is no universal acceptable volume: cooler shape, service interval, ventilation layout, and engine specifications matter. A wet seam may simply mark where that mist escapes through an air leak.
Drainable pools, oil that quickly returns after approved cleaning, rising oil consumption, or blue smoke need investigation. Check crankcase ventilation, turbocharger condition, and oil drainage before calling it a failed seal. Oil alone cannot identify the faulty component.
Pooled oil can be drawn into the engine and create a runaway risk, so do not restart until it is addressed. After a compressor failure, follow the engine manufacturer's cooler cleaning or replacement requirement: trapped fragments can later enter the engine. Use approved cleaning and drying methods, leaving no pooled liquid, solvent, or loose debris.
Decide whether to repair or replace
The leak's location matters, but so does the condition of the surrounding material.
| Finding | Practical decision |
|---|---|
| Loose clamp or damaged boot | Replace the failed hardware or hose, then retest before condemning the cooler |
| Localized, accessible tank crack | Consider specialist repair if the cooler manufacturer permits it and surrounding material is sound |
| Multiple leaking tubes, corrosion, or widespread joint damage | Replacement is usually the more dependable option |
| Internal coolant crossover | Replace unless an approved specialist repair can restore and verify both circuits |
| Compressor fragments or heavy contamination | Follow the engine manufacturer's replacement or cleaning requirement |
Do not treat an external sealant patch as a verified structural repair. Heat, oil, vibration, and pressure cycling demand a suitable repair process.
After repair, repeat the specified leak test. Also inspect fins and check for internal restriction: a cooler can hold pressure yet transfer heat poorly or restrict airflow. Keep the results with a used or rebuilt cooler.
Inspect mounts and pipe alignment before installation so the repaired unit is not forced back into a stressed position. After reinstalling, confirm the original complaint is resolved using the manufacturer's operating-check procedure. A bench pass cannot detect a loose clamp introduced during installation.
Common Questions
What pressure should I use for a charge air cooler pressure test?
Use the vehicle or cooler manufacturer's specified test pressure, hold time, and allowable loss. There is no universal pressure for every diesel cooler. If the specification is unavailable, get it before testing; normal boost pressure alone is not a test procedure.
Does a pressure drop always mean the core is cracked?
No. Leaking caps, fittings, hoses, or cooling test air can lower the reading. Stabilize temperature, check the fixture, and locate escaping air before condemning the core.
Why is my intercooler leaking oil?
Oil mist from the intake can escape with boost air at a loose joint or crack. A light internal film can come from crankcase ventilation. Pooling oil, rising oil consumption, or blue smoke needs investigation; oil alone does not prove turbocharger failure.
Can a water-cooled cooler leak internally without dripping outside?
Yes. A failed internal barrier can connect the coolant and charge air passages without an external drip. Test the circuits separately using their own approved limits, and check for transfer into the opposite passage.
Will an intercooler leak test catch heat-related cracks?
Not always. Some cracks open only with heat, vibration, or installed stress. If symptoms continue, use the manufacturer's follow-up procedure and inspect mounts, hoses, and clamps under the conditions it specifies.
Intercooler leak vs turbocharger failure: how can I tell?
Isolate and pressure-test the intercooler using the manufacturer's procedure, and inspect pipes, boots, clamps, and connections for leaks. Oil alone cannot identify the faulty component: a light film may come from crankcase ventilation. If oil pools, oil consumption rises, or blue smoke appears, check crankcase ventilation, turbocharger condition, and oil drainage.
Does turbocharger failure require intercooler replacement?
Not necessarily. After compressor failure, follow the engine manufacturer's requirement for intercooler cleaning or replacement. Trapped fragments can later enter the engine. If cleaning is allowed, use approved cleaning and drying methods, leaving no pooled liquid, solvent, or loose debris before reinstalling the cooler.
For help selecting a replacement turbocharger, CHRA, or repair kit, contact LeadTurbo with the turbo part number and engine details.